Connect the MCP-Server with your AI applications!
Step-by-step guides to integrate your MCP-Server with various AI applications.
Transport Protocol: SSE
4 snippets available
OpenAI Playground (SSE)
Connect your SSE MCP-Server to OpenAI using the playground.
Requirements:
Your containerized server is installed on your server and is using a valid SSL certificate.
Start your MCP-Server (Only necessary for On-Premise Setup)
a. Unzip the downloaded zip file.
b. Use the shipped docker-compose.yaml file or create one yourself.
c. Open the docker-compose.yaml file and check for any environment variables that you might need to replace
d. Start your container using the included start.bat or start.sh files or start the containerized compose yourself using:
# Run on windows:
start.bat
# Run on linux:
start.sh
# Run with docker-compose:
docker-compose up
# Run with podman-compose:
podman-compose up
e. Verify the logs to see if your MCP-Server started successfully
Add MCP-Server
Click on Tools: "Add"
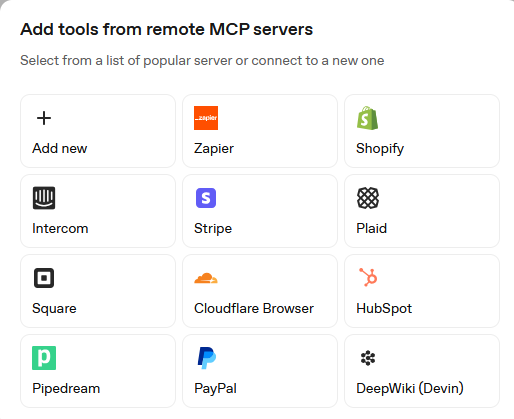
Add the URL to your MCP-Server using: "https://www.example.com/sse". The /sse must be added.
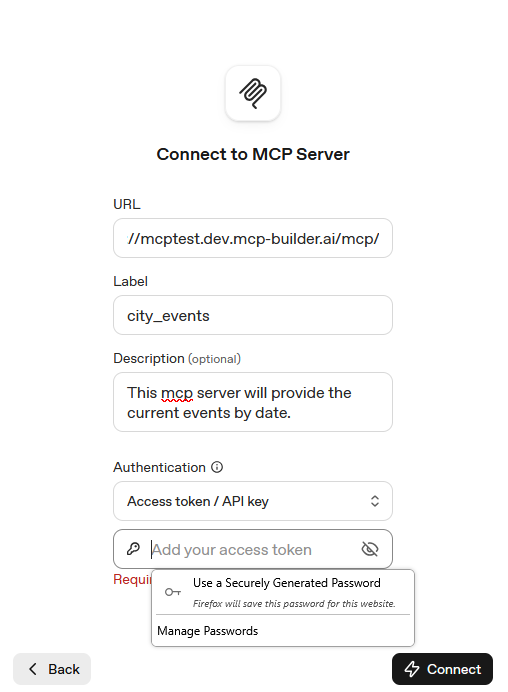
If your MCP-Server is secured with authentification, then set the credentials under Authentification.
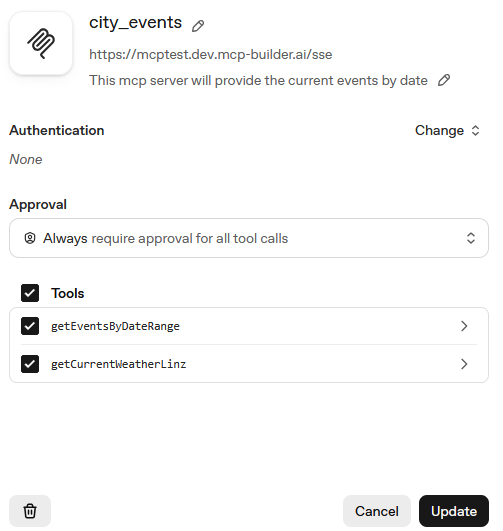
When everything works, you will see the tools available in your MCP-Server.
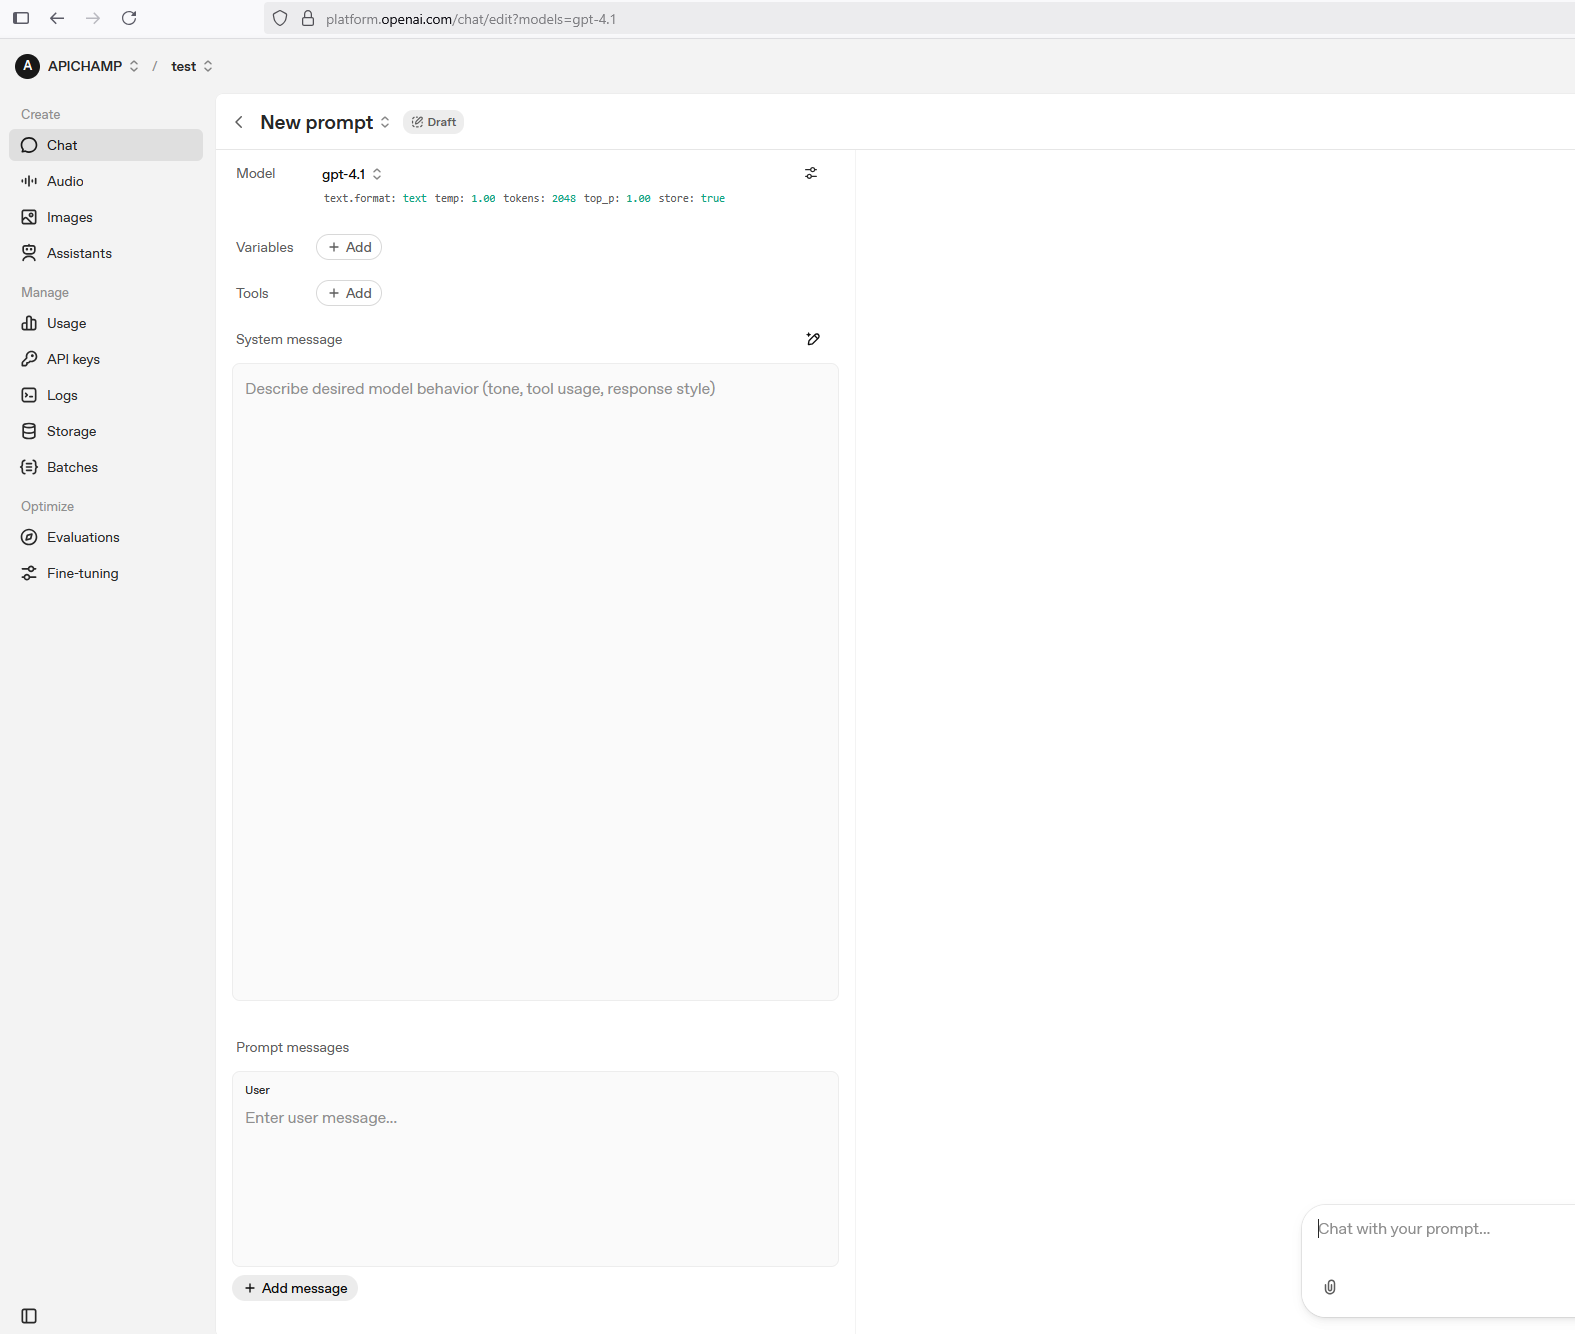
Add a system message and prompt
No add the wanted system message and test your MCP-Server connection
OpenAI SDK (SSE)
Connect your SSE MCP-Server using the OpenAI SDK
Requirements:
Your application must use the OpenAI SDK
The server or local machine has is able to run containerized apps with podman or docker.
Start your MCP-Server (Only necessary for On-Premise Setup)
a. Unzip the downloaded zip file.
b. Use the shipped docker-compose.yaml file or create one yourself.
c. Open the docker-compose.yaml file and check for any environment variables that you might need to replace
d. Start your container using the included start.bat or start.sh files or start the containerized compose yourself using:
# Run on windows:
start.bat
# Run on linux:
start.sh
# Run with docker-compose:
docker-compose up
# Run with podman-compose:
podman-compose up
e. Verify the logs to see if your MCP-Server started successfully
Add your MCP-Server
Add your MCP-Server to your OpenAI SDK code:
from openai import OpenAI

client = OpenAI()

resp = client.responses.create(
    model="gpt-4.1",
    tools=[{
        "type": "mcp",
        "server_label": "your_project_name",
        "server_url": "https://www.linktoyourserver.com/mcp",
    }]
)
MCP-Inspector (SSE)
Debug your SSE MCP-Server
Requirements:
npx is installed NPX
The server or local machine has is able to run containerized apps with podman or docker.
Start your MCP-Server (Only necessary for On-Premise Setup)
a. Unzip the downloaded zip file.
b. Use the shipped docker-compose.yaml file or create one yourself.
c. Open the docker-compose.yaml file and check for any environment variables that you might need to replace
d. Start your container using the included start.bat or start.sh files or start the containerized compose yourself using:
# Run on windows:
start.bat
# Run on linux:
start.sh
# Run with docker-compose:
docker-compose up
# Run with podman-compose:
podman-compose up
e. Verify the logs to see if your MCP-Server started successfully
Start & Open MCP Inspector
Open the terminal and run:
npx @modelcontextprotocol/inspectorGet more infos at:MCP-Inspector

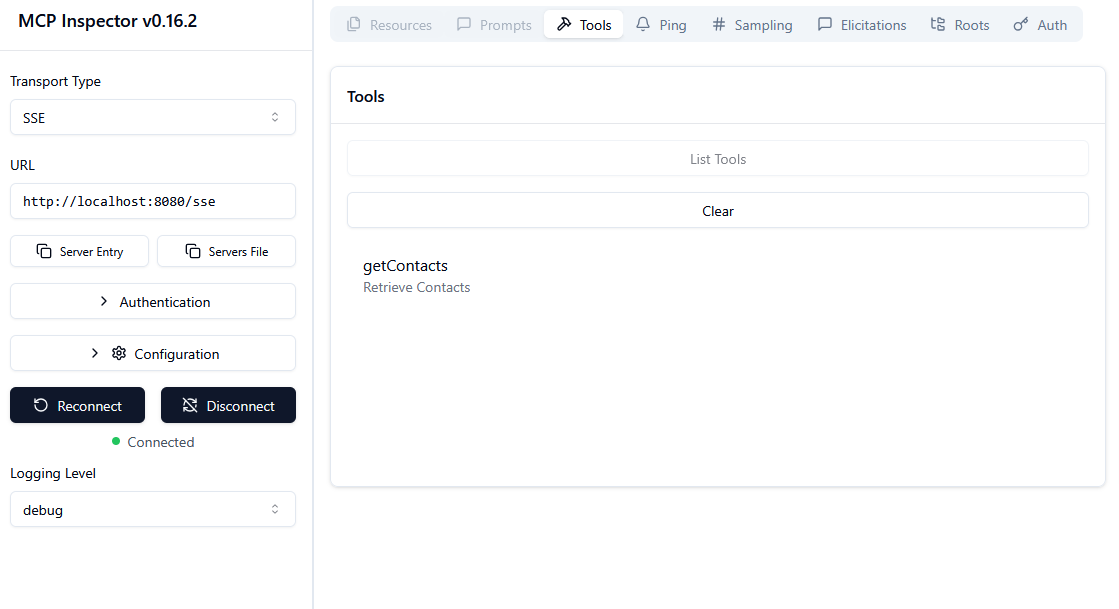
Connect with your SSE Server
Enter the url to your SSE Server
If your SSE Server requires any additional header parameters or secrets you have to add them under Authentication.
MCP-Inspector will send all Header Parameters in lower-case. MCP-Builder.ai is handling input parameters case-sensitive - meaning you must make PARAM(xx) values in your specs operation configuration files´s lower case as well.
Others (SSE)
Connect your SSE MCP-Server to other AI applications
Requirements:
Your AI application or SDK includes MCP-client functionality and support the SSE Transport Protocol.
See a full list of supported clients here: See which tools support MCP-Client
The server or local machine has is able to run containerized apps with podman or docker.
Start your MCP-Server (Only necessary for On-Premise Setup)
a. Unzip the downloaded zip file.
b. Use the shipped docker-compose.yaml file or create one yourself.
c. Open the docker-compose.yaml file and check for any environment variables that you might need to replace
d. Start your container using the included start.bat or start.sh files or start the containerized compose yourself using:
# Run on windows:
start.bat
# Run on linux:
start.sh
# Run with docker-compose:
docker-compose up
# Run with podman-compose:
podman-compose up
e. Verify the logs to see if your MCP-Server started successfully
Add the MCP-Server to your app
Use the following settings to connect with your MCP-client:
"command": "your-executable-path"Transport Protocol: STDIO
3 snippets available
Claude Desktop (STDIO)
Connect your STDIO MCP-Server to Claude Desktop
Requirements:
Claude Desktop is installed - Download it from: https://claude.ai/download
Prepare your MCP-Server
Depending on your operation system your zip file will include different executables. Make sure to unzip the whole folder.
You don´t have to start the executable file - The STDIO client will do that for you in the next steps!
You are all set. Continue with step 2.
Running on LinuxMake the /lib/MCP-BuilderAI file executable.
chmod +x /path/to/your/lib/MCP-BuilderAIMake the /MCP-BuilderAI.app/Contents/MacOS/MCP-BuilderAI file executable.
chmod +x /path/to/your/MCP-BuilderAI.app/Contents/MacOS/MCP-BuilderAIIf you receive a message indicating that MCP-BuilderAI.app is invalid, it's likely because macOS has quarantined the executable.
Verify if your file has been quarantined.
xattr MCP-BuilderAI.appRemove the quarantine flag from your executable
xattr -d com.apple.quarantine MCP-BuilderAI.appOpen Settings
Open Claude Desktop Settings
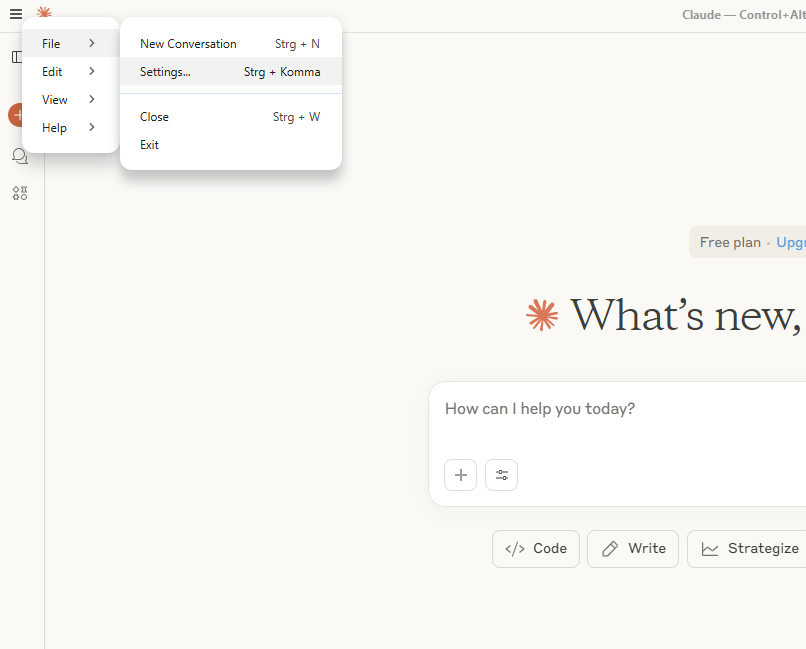
Edit MCP-Server Config
Go to Developer -> Edit Config and Open the claude_desktop_config.json file.
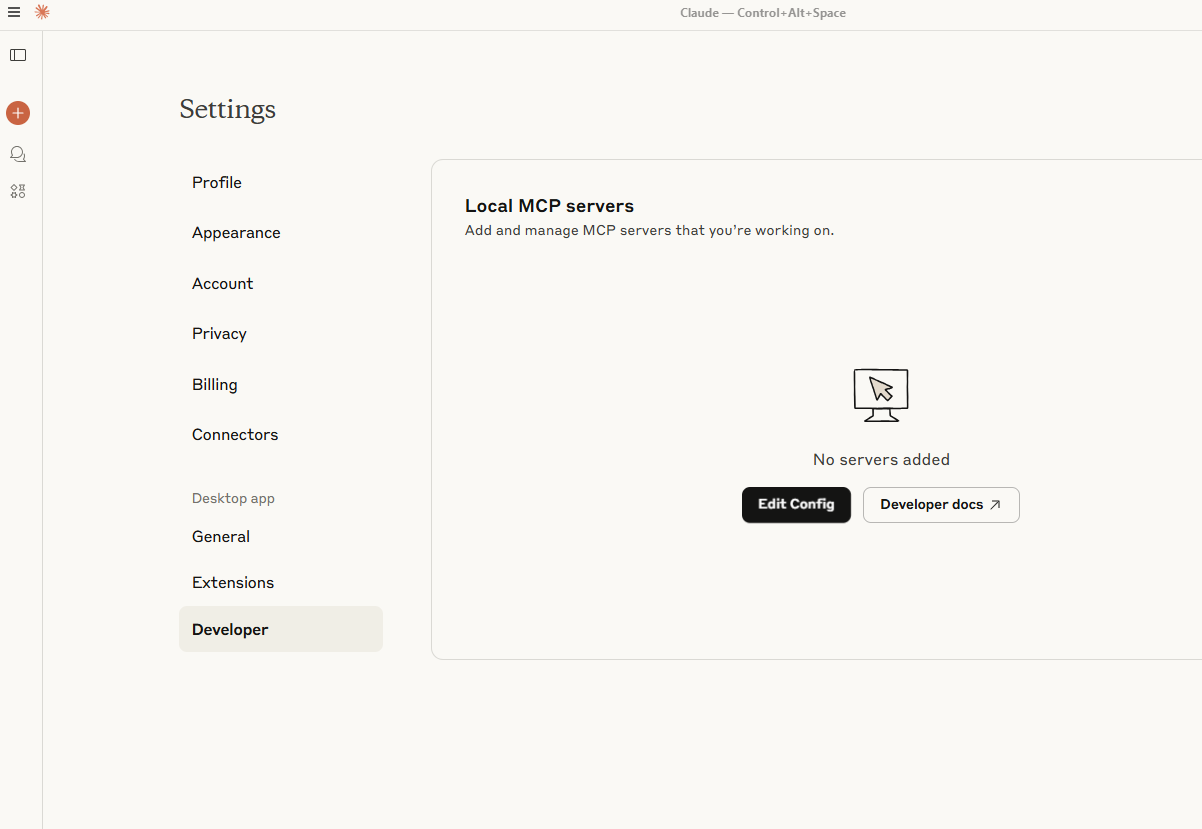
Add your MCP-Server to your Claude Instance
Add the following claude_desktop_config.json file.
If you have multiple MCP servers, list each one under the mcpServers array.
{
  "mcpServers": {
    "your-mcp-project": {
      "command": "/path/to/MCP-BuilderAI.exe",
      "env": {}
    }
  }
}
Depending on your operation system you might need to eccape your path using \\.
For example: C:\\Users\\....
Restart Claude Desktop
Close and restart Claude Desktop to load the new MCP server configuration.
To verify if the MCP-Server is connected ask Claude Desktop: "Which MCP Tools do you have?"
MCP-Inspector (STDIO)
Debug your STDIO MCP-Server
Requirements:
npx is installed NPX
Prepare your MCP-Server
Depending on your operation system your zip file will include different executables. Make sure to unzip the whole folder.
You don´t have to start the executable file - The STDIO client will do that for you in the next steps!
You are all set. Continue with step 2.
Running on LinuxMake the /lib/MCP-BuilderAI file executable.
chmod +x /path/to/your/lib/MCP-BuilderAIMake the /MCP-BuilderAI.app/Contents/MacOS/MCP-BuilderAI file executable.
chmod +x /path/to/your/MCP-BuilderAI.app/Contents/MacOS/MCP-BuilderAIIf you receive a message indicating that MCP-BuilderAI.app is invalid, it's likely because macOS has quarantined the executable.
Verify if your file has been quarantined.
xattr MCP-BuilderAI.appRemove the quarantine flag from your executable
xattr -d com.apple.quarantine MCP-BuilderAI.appStart & Open MCP Inspector
Open the terminal and run:
npx @modelcontextprotocol/inspector
Get more infos at:MCP-Inspector
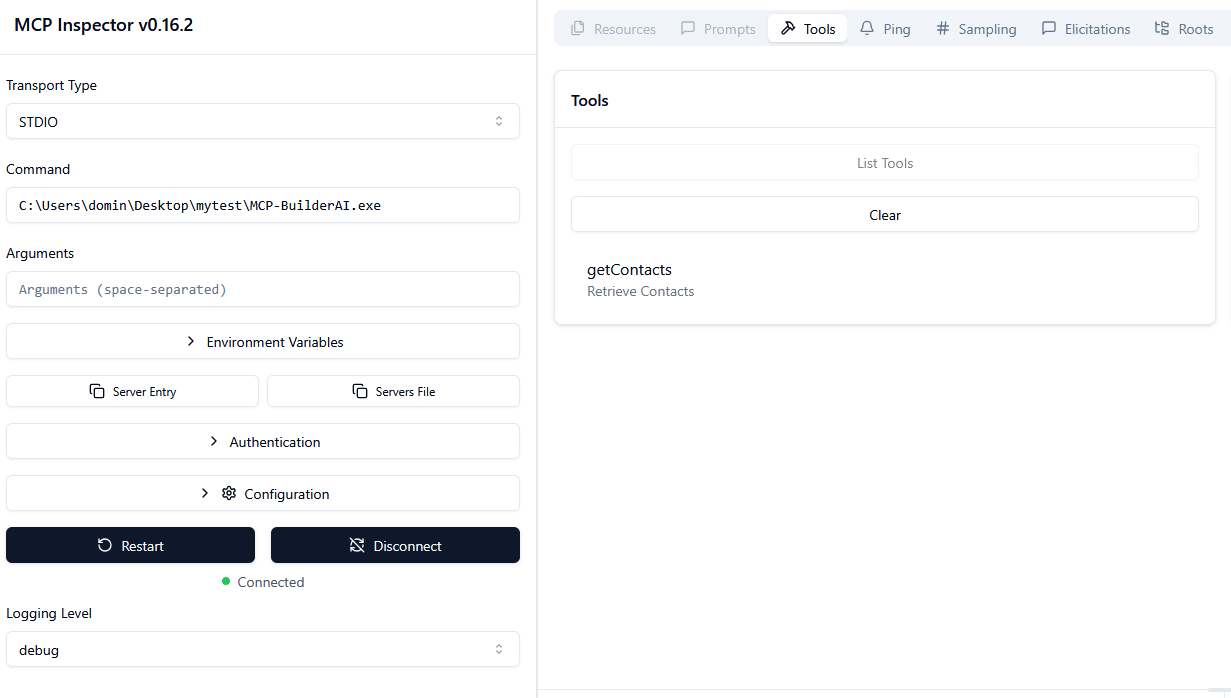
Connect with your STDIO Server
Enter the path to your exe file
Others (STDIO)
Connect your STDIO MCP-Server to your AI Application
Requirements:
Your AI application or SDK support MCP-client functionality. from: See which tools support MCP-Client
Prepare your MCP-Server
Depending on your operation system your zip file will include different executables. Make sure to unzip the whole folder.
You don´t have to start the executable file - The STDIO client will do that for you in the next steps!
You are all set. Continue with step 2.
Running on LinuxMake the /lib/MCP-BuilderAI file executable.
chmod +x /path/to/your/lib/MCP-BuilderAIMake the /MCP-BuilderAI.app/Contents/MacOS/MCP-BuilderAI file executable.
chmod +x /path/to/your/MCP-BuilderAI.app/Contents/MacOS/MCP-BuilderAIIf you receive a message indicating that MCP-BuilderAI.app is invalid, it's likely because macOS has quarantined the executable.
Verify if your file has been quarantined.
xattr MCP-BuilderAI.appRemove the quarantine flag from your executable
xattr -d com.apple.quarantine MCP-BuilderAI.appAdd the MCP-Server to your app
Use the following settings to connect with your MCP-client:
"command": "your-executable-path"Set the environment variables:
"env": ${}